Showing posts with label Winter. Show all posts

20 November 2013

Finnish Stars

I have never been much of a paper crafter. My idea of scrapbooking is sticking pictures in an album in a pleasing composition and adding the date the picture was taken. Possibly the location. Those years that I decide to make my own Christmas cards, it almost always involves ornaments made of fabric or wood (this year is no different), and my die cutting supplies are used for cutting fabric pretty much exclusively.


That doesn’t mean I don’t like paper crafts. On the contrary, I have devoted an entire Pinterest board to it. I just never seem to get around to making some. Until a few weeks ago. We were all up north visiting my parents-in-law. While my husband and his dad were out putzing in the woods, prepping for the upcoming hunting season, Lola and I tried our hand at making Finnish Stars. It couldn’t have been easier. And since all you need is one sheet of paper, it’s a pretty cheap craft, too!

What you will need:

  • One sheet of 12” by 12” paper, preferably printed on both sides
  • Glue stick
  • Paper cutter (optional)
  • Scissors
  • Cutting mat (optional)
  • Ruler
  • Paperclips
  • Small hole punch
  • String

Begin by cutting your sheet, I used vintage sheet music, into 3/4” strips. You’ll need twelve strips in total, two sets of six strips.

Start with two strips of paper, crossing one on top of the other, and securing them in the middle with a little glue. Make sure the four ends are of the same length.

Take a second strip of paper and glue it above your horizontal strip, leaving a little space in between, and making sure it is glued on the other side of the vertical strip. You will be weaving your paper strips, one over, one under.

Repeat with another strip below your first horizontal strip.

Now take the remaining two strips and weave them vertically over and under your horizontal strips, securing them at the intersections with a little glue.

Repeat these steps to make the second set.

Now comes the fun part. Take the two ends at the top, fold them towards you and glue in place. Secure with a paperclip while the glue dries. This is especially important if you are using a heavier cardstock.

Repeat this step with all four corners. Don’t worry about the middle strip at this point.

Do this to the other set as well.

When all your corners are glued in place, take one set, flip it over and place it on top of the other set, matching each middle piece of paper to a glued corner.

Carefully insert the middle paper strips into the the corners.

Glue them in place and let dry.

Once the glue is dry, take your scissors and trim the corners.

Take your hole punch and make a small hole in one of the corners and attach your string. Then go overboard and make half a dozen more.

Or bling ‘um up with a felt snowflake and some vintage costume jewelry.

Lovely, aren’t they? And so easy to make. Enjoy!

16 November 2012

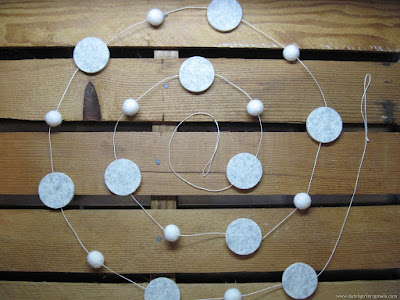
Winter Garland

I have fallen in love with Scandinavian Christmas and winter décor. At present I read about five or six blogs from Denmark, Sweden, and Norway. The language barrier is not a problem, I let the pictures speak for themselves. If the need arises, there’s always Google Translate.

The elements of nature, the warm winter white, the use of galvanized materials; I plan to incorporate it all into my Christmas decorations this year. Perhaps I’ll add a touch of red here and there. Except for the tree, that is and always will be a very colorful collection of memories.


I am linking my winter garland up with:

Friday’s Nature Table at The Magic Onions
Creative Friday at Natural Suburbia

04 October 2012

Candy Cane Lane

The minute I signed up for a craft show, I was offered a job. Relieved yet reluctant, I traded in my craft room for an office, and my felt for a notepad. But I have committed to being part of our local Fall Festival, and I am sticking to my word. So I have a smaller booth, who cares. As long as I am having fun, right?

However, crafting because you have to sort of feels like a chore. I was not having as much fun as I hoped for. As I was churning out the ornaments, garlands, and gnome homes, I caught myself thinking "I'll be glad when this is over." Spending every evening in my craft room after a full day's work is starting to take its toll.

But then...

I have had this idea in my head for months. It started as a gnome home but my choice of felt colors made it clear this home is not just for any gnome. No, this is where Santa and Mrs Claus live. This house sits on Candy Cane Lane.

It needed to be finished still and its residents needed to be dressed (with a little help from Wee Folk Art for Santa). But when it all came together, I instantly remembered why I love doing this so much.


Lola is going to be tickled pink when she wakes up. There is no way this one is going to the fair or the shop.

Candy Cane Lane


I am linking the Claus's and their abode up to:
Creative Friday at Natural Suburbia
Friday's Nature Table at The Magic Onions

21 December 2011

Birdseed Ornaments

In my pantry sits a tub of lard I bought years ago. It was intended to make birdseed balls with. I am not really sure if lard is suitable for birds, though. Our local Piggly Wiggly sells beef suet by the log. They are ideal for making birdseed ornaments, although I guess you can just hang them outside as is. But where's the fun in that?

We melted the 22 oz. suet log over medium heat and stirred in three cups of birdseed. I set out three extra large cookie cutters partially wrapped in aluminum foil on a baking pan, as well as an assortment of little molds lined with plastic wrap. We poured in the melted suet/seed mixture and set the baking pan in the freezer.

After about two hours I took them out and let them thaw out just enough to make it easier to release the ornaments from the mold. I removed the little pieces of a drinking straw to make a hole and strung the ornaments on some butcher's twine. Aren't they lovely? I have already spotted a little chickadee munching on one.


The Scent Of The Season


Lola and I were making birdseed ornaments earlier, with suet. I don't like the smell of melting suet, so I whipped a fresh batch of stove top potpourri:

One orange, quartered
A good teaspoon of cloves
Some whole allspice
Three cinnamon sticks
About half a cup of cranberries
A dash of vanilla

Add water and simmer softly all day. The original recipe says this batch will last you all season as long as you add fresh water every morning.

20 December 2011

DIY Snowglobes

No snow? No problem. We will make our own snowy winter scenes. All you need is Epsom salts, bottle brush trees, little figurines, and clear mason jars. And presto! Instant winter wonderland.


13 December 2011

Jingle Bells

Silver jingle bells on stakes adorn the path from the garage to the house. Just like me, they are waiting for snow. There is some in the forecast for the next two days.

When I first saw this idea on Pinterest, I immediately took off for the Dollar Tree to stock up on their extra large jingle bells. I knew I still some shorter shepherd's hooks in the shed. Or so I thought.

I had forgotten that a lot of the gardening stuff did not make it back to Wisconsin when we moved. Including the shepherd's hooks. And they are a little hard to come by this time of year.

Looking for an alternative, I found plant props, still available at home improvement stores. They are easy to bend to hang the jingle bell. Quick and easy, my kind of project.

I still feel something is missing though. Oh, that's right. Snow. And possibly a little winter greenery.

07 December 2011

Doily Snowflake Ornaments


We are still waiting for snow up here in the Northwoods. But since the temperature has dropped to freezing, both day and night, I made my own snowflakes by freezing doilies in baking pans and hanging them in the trees in our backyard. It couldn't be more simple.

I used boiled water, cooled, because it results in clearer ice. The only tricky part is making a hole in the ice once the doilies have frozen. I used a hand drill but any sharp object will do. Just don't go too fast or push too hard. Thread the ornament with string and hang from a branch. Watch them sparkle in the sunlight. Beautiful.


I am linking up to A Little Birdie Told Me at Rook No. 17.

30 November 2011

Wreaths

I love wreaths, especially around the holidays, but lack the patience to make them. Instead I scour flea markets and the aisles of Goodwill and other local thrift stores to breath new life into discarded beauties. My collection is growing and it is starting to look quite festive around the house.

My Handmade Gift Exchange partner Heather surprised me with a gorgeous specimen made of rolled up vintage paper and an antique ornament. I love it! Thank you, Heather. And Merry Christmas!

15 November 2011

Frosty The Snowman

Inspired by a pin on Pinterest (which I could not trace to its creator - I'm sorry, I tried), I recreated Frosty the Snowman out of three grapevine wreaths, some burlap, and a piece of plywood cut in the shape of a top hat on the side of the garage. My daughter looked on from the upstairs window, giving me the thumbs up when I finished assembling him.

The wreaths are not tied together, I simply hammered nails into the wooden siding of the garage and hung them individually. I started with the bottom wreath and worked my way up. The scarf is also attached to the garage with a few small nails to keep it from blowing away. The top hat hangs from a cup hook screwed into the wall and is attached to the wreath with a little bit of floral wire.

And wouldn't you know it. Just minutes after finishing Frosty, it started to snow! A twist on "If you build it, they will come..."


This project was featured on  A Little Birdie Told Me... at Rook No. 17.