Showing posts with label Garland. Show all posts

01 December 2013

Handmade Gift Exchange

My partner in this year’s handmade gift exchange hosted by Linda at Craftaholics Anonymous lives in sunny California and loves bright colors and polka dots. She and I freely perused each other’s Pinterest boards trying to learn about our tastes and preferences.

I noticed right away she seemed to like chunky jewelry. It so happens I love making chunky jewelry. After playing around with different colors, sizes, and textures, I settled on cheerful felt balls, some of them beaded, alternated with gold plated resin nuggets, yellow pressed glass beads, green wooden disks, and (died) turquoise spacer beads.


For L.’s home I made some jewelry, too. A six or seven ft. garland made from brightly colored polka dots, sewn together with yellow thread.

Of course I couldn’t just send off her gifts. I always like to have some fun with the giftwrap as well. Last year I discovered the fun of sewing paper stockings for Lola’s teachers to hold their gifts. For L. I sewed her necklace into a paper ornament. The only way to open it, is to rip it apart. A real Christmas tree ornament made from vintage sheet music holds a small card, and a little bottle brush tree and a red felt snowflake adorn the paper stocking that holds the garland.

I very much enjoyed creating these gifts for L. and I hope she will enjoy them, too. I will show you what L. made for me tomorrow. I can tell you now it is fabulous. She definitely spoiled me.

Merry Christmas, L.!

14 October 2013

Spooky Space


Lola and I were tickled orange when Jo-Ann Fabric and Craft Stores asked us to participate in the Celebrate The Season Campaign by creating a #spookyspace for Halloween. Our original plan was to turn Lola’s woodlands bedroom into a spooky forest, but our stairwell is painted in such a lovely pumpkin orange, I couldn’t possibly pass that up as a back drop to my spooky space.


Since I could not use the tree in Lola’s room, my first order of business was to find a nicely sized dead tree. There happened to be one available on the roof deck, but any large branch would have done just as well. After cleaning the smaller branches up a bit, I brought it inside. I considered spray painting it, but rather liked the gray so I left it as it was.

Spooky spaces always have spider webs. I created one with 16 and 22 gauge wire. I started by cutting four 12” lengths of the heavier wire. To prevent poking anyone’s eyes out, and because I like the look, I curled the ends of the spokes before I weaved the thinner wire around them. To make it easier to work with, I cut the 22 gauge wire into roughly 3’ lengths. I needed about four of those.


Again, I thought about spray painting the spider web, but felt it looked perfect as it was. Some might consider this laziness, but I am all about aesthetics, honestly. After attaching the spider web to the branches with wire, I hung five cute little fleece crows, found at Jo-Ann, in our spooky tree, along with some cheese cloth ghosts from Halloweens past.


One of my favorite things to do, is make garlands with felt cut-outs. For this I use my trusted Cuttlebug® die cutting machine and Sizzix Bigz dies. I love these dies because they cut though fabric as though it were butter. The Cuttlebug® works with every brand die, so if you’re thinking about buying one, that is the one I would recommend.

I found some lovely suiting fabric in the remnant bin at Jo-Ann’s which I paired up with black wool felt. I affixed them to each other with Heat’n Bond Lite. It bonds really well while still allowing for sewing. By ironing the two fabrics together, it also takes care of any fraying edges. After creating my double layer, I cut the fabric into smaller pieces and ran them through the Cuttlebug®.


For this particular garland I used Tim Holtz’s tattered leaves die. From the pile of leaves I cut, I was able to sew two 6’ garlands. Nothing special, just line up the leaves and sew them together with a straight stitch, leaving about an inch of thread in between.

Once the garlands were finished, it was time to stage our #spookyspace. I found two beauty school heads at a thrift store a long time ago, and wrapped one in gauze. Though it’s not new, my Halloween Wreath was brought out as well since it is still one my all time favorite decorations. It looks really good against the metal door.


Lastly, I threw in a pumpkin or two, some rubber mice, a few horse chestnut spiders, and our spooky space was complete. I hope the neighbors like it, too.


If you’re feeling crafty and are looking for inspiration, take a look at Jo-Ann’s Celebrate The Season and Simply Spooktacular websites. What’s more, here is a 50% off coupon for you. Enjoy!

I was compensated by Jo-Ann for writing this post. However, the opinions expressed in this review are my own.

25 May 2013

Stars And Checkers

It’s Memorial Day weekend here in the United States and that calls for a little red, white, and blue. But rather than stars and stripes, I went for stars and checkers instead. It looks very festive, I think.

I fused gingham cotton in blue and red onto navy blue and red wool felt, and cut out stars in different sizes. With a small hole punch I made two holes in my stars and strung them on a length of red and white baker’s twine.


Have a lovely Memorial Day weekend, everyone! Enjoy the extra day off. I think I'll go out and do some garage-saling.


I am linking my starts and checkers garland up at:
The Humble Brag Party at One Project Closer
Friday's Nature Table at The Magic Onions
Creative Friday at Natural Suburbia
Pin Me Linky Party at Diana Rambles

22 April 2013

Pastel Hearts

A customer requested my rainbow heart garland for her mother’s wedding which she is planning. She wondered if I could make it in pastel colors. Why, of course! I love how it turned out.


Even better: I was able to go outside for a quick photo shoot without having to put on a snowsuit. Not that I would call it spring yet. Much too cold still. But I did see the first of my bulbs come up. Finally evidence of spring.

21 March 2013

Bunnies

Perhaps it’s because there is still at least a foot of snow on the ground, and more falling as I type, but I am just not feeling the pastel colors this Easter. I went for navy, gray, and white instead.


The blue bunnies are made of a very heavy navy wool with gingham cotton in two sizes fused to the back. I used a small rectangular hole punch to create holes in their ears and strung them onto some lovely yellow satin ribbon.

The gray and white bunnies are made of 3mm thick 100% merino wool felt, strung on yellow and pink baker’s twine. Now all I need are some branches to hang them from. Normally I would go outside to snip a few here and there, but not today. I am staying inside.

I just listed them in the shop if you would like some, too. Happy Easter!


Linking up at:
The Humble Brag at One Project Closer
Creative Friday at Natural Suburbia
Friday's Nature Table at The Magic Onions

10 January 2013

Hearts On A String

If you sew two 3” by 9” (or longer) rectangles of thick gray felt together along one side, turn them inside out and sew along the other side, and then cut 1/2” strips, you end up with lots of cute little hearts.

If you string those cute little gray hearts with a mixture of multicolored pompons and felt balls in all sizes and colors, some of them with beads, you end up with a funky heart garland. Just in time for Valentine’s Day.


My inspiration for the hearts came from Pinterest, where else?


I am linking up at Natural Suburbia and The Magic Onions.

16 November 2012

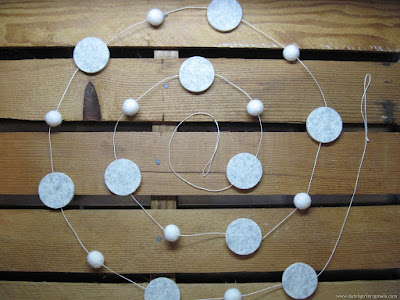
Winter Garland

I have fallen in love with Scandinavian Christmas and winter décor. At present I read about five or six blogs from Denmark, Sweden, and Norway. The language barrier is not a problem, I let the pictures speak for themselves. If the need arises, there’s always Google Translate.

The elements of nature, the warm winter white, the use of galvanized materials; I plan to incorporate it all into my Christmas decorations this year. Perhaps I’ll add a touch of red here and there. Except for the tree, that is and always will be a very colorful collection of memories.


I am linking my winter garland up with:

Friday’s Nature Table at The Magic Onions
Creative Friday at Natural Suburbia

09 November 2012

Leaves For Thanksgiving

I finished my very first custom order last night. A set of oak leaf place cards and a leaf garland to match. It's a hostess gift for a Thanksgiving dinner party. My friend S. asked me to make them after she saw my booth at our Fall Festival a month ago. She came over to my house and we picked out the fabric together but the design was left up to me.

The leaf place cards were cut by hand and sewn together two by two with a simple straight stitch. The little paper name tags will be taped to the leaf after the names have been written on them. Since S. is a big lover of acorns, I decided to add acorns to the tags. After three failed attempts to carve an acorn stamp myself, I broke down and ordered one on Etsy. It's perfect for this project.

She also asked me to make a garland to go with the place cards. Those leaves were cut with a die cutting machine. I hope S. likes the end result. I certainly do. So if she doesn't, no problem. I'll keep them for myself.